Android實現一個比相冊更高大上的左右滑動特效(附源碼)
在Android里面,想要實現一個類似相冊的左右滑動效果,我們除了可以用Gallery、HorizontalScrollView、ViewPager等控件,還可以用一個叫做 ViewFlipper 的類來代替實現,它繼承于 ViewAnimator。如見其名,這個類是跟動畫有關,會將添加到它里面的兩個或者多個View做一個動畫,然后每次只顯示一個子View,通過在 View 之間切換時執行動畫,最終達到一個類似相冊能左右滑動的效果。
本次功能要實現的兩個基本效果
最基本的左右滑動效果 從屏幕的45度方向進入和退出的效果實現思路 按照 ViewFlipper 的源碼說明,它是將兩個或多個View用動畫展示出來。那么我就在 ViewFlipper 內放入兩個布局,每個布局都包含一個 TextView 和 ImageView,分別用于顯示文字和圖片 既然要有動畫效果,我準備使用Android的位移動畫類 TranslateAnimation,設置起始的橫縱坐標值 為了讓效果明顯,我會設置 ViewFlipper 的進入和退出屏幕的動畫,并且在左滑時呈現一個動畫、右滑時呈現另一個動畫(需要判斷是左滑還是右滑:重寫 onTouchEvent 方法,比較橫坐標X的值的變化)源碼如下:1、主Activity
// import語句省略public class ViewFlipperDemo extends Activity { private static final String TAG = 'ViewFlipperDemo'; private ViewFlipper mViewFlipper; private float mOldTouchValue; @Override protected void onCreate(Bundle onSavedInstance) { super.onCreate(onSavedInstance); // 設置為全屏 getWindow().setFlags(WindowManager.LayoutParams.FLAG_FULLSCREEN, WindowManager.LayoutParams.FLAG_FULLSCREEN); requestWindowFeature(Window.FEATURE_NO_TITLE); setContentView(R.layout.view_flipper_demo); mViewFlipper = findViewById(R.id.viewFlipper1); } @Override public boolean onTouchEvent(MotionEvent event) { switch (event.getAction()) { case MotionEvent.ACTION_DOWN:mOldTouchValue = event.getX();break;case MotionEvent.ACTION_UP: float currentX = event.getX(); // 手指向右滑動: 手指向右滑動時橫坐標 X 的值會變大,因此 currentX 的值更大 if (mOldTouchValue < currentX) { // 進入屏幕的動效 mViewFlipper.setInAnimation(AnimationHelper.inFromLeftAnimation()); // 退出屏幕的動效 mViewFlipper.setOutAnimation(AnimationHelper.outToRightAnimation()); mViewFlipper.showNext(); } // 橫坐標的值變小,說明是左滑 if (mOldTouchValue > currentX) { // 進入屏幕的動效 mViewFlipper.setInAnimation(AnimationHelper.inFromRightAnimation()); // 退出屏幕的動效 mViewFlipper.setOutAnimation(AnimationHelper.outToLeftAnimation()); mViewFlipper.showPrevious(); } break;default: break; } return super.onTouchEvent(event); }}
2、對應的布局文件 view_flipper_demo.xml
<LinearLayout xmlns:android='http://schemas.android.com/apk/res/android' android:layout_width='match_parent' android:layout_height='match_parent' android:orientation='vertical'> <TextView android:layout_width='match_parent' android:layout_height='wrap_content' android:textColor='@color/colorBlack' android:gravity='center' android:text='這是一個ViewFlipper樣例' android:paddingTop='20dp'/> <ViewFlipper android:layout_width='match_parent' android:layout_height='match_parent' android:id='@+id/viewFlipper1'> <LinearLayout android:layout_width='match_parent' android:layout_height='match_parent' android:orientation='vertical' android:gravity='center'> <TextView android:layout_width='match_parent' android:layout_height='wrap_content' android:textColor='@color/colorBlue' android:gravity='center' android:text='這是第一個ViewFlipper頁面'/> <ImageView android:layout_width='wrap_content' android:layout_height='wrap_content' android:src='http://m.4tl426be.cn/bcjs/@drawable/avasterdr'/> </LinearLayout> <LinearLayout android:layout_width='match_parent' android:layout_height='match_parent' android:orientation='vertical' android:gravity='center' > <TextView android:layout_width='match_parent' android:layout_height='wrap_content' android:textColor='@color/colorBlue' android:gravity='center' android:text='這是第二個ViewFlipper頁面'/> <ImageView android:layout_width='wrap_content' android:layout_height='wrap_content' android:src='http://m.4tl426be.cn/bcjs/@drawable/avastertony'/> </LinearLayout> </ViewFlipper></LinearLayout>
3、動畫輔助類 AnimationHelper.java
public class AnimationHelper { // 左滑的進入動畫 public static Animation inFromRightAnimation() { Animation inFromRight = new TranslateAnimation(Animation.RELATIVE_TO_PARENT,1.0f,Animation.RELATIVE_TO_PARENT,0.0f,Animation.RELATIVE_TO_PARENT,0.0f,Animation.RELATIVE_TO_PARENT,0.0f); inFromRight.setDuration(500); inFromRight.setInterpolator(new AccelerateInterpolator()); return inFromRight; } // 左滑的退出動畫 public static Animation outToLeftAnimation() { Animation outToLeft = new TranslateAnimation(Animation.RELATIVE_TO_PARENT,0.0f,Animation.RELATIVE_TO_PARENT,-1.0f,Animation.RELATIVE_TO_PARENT,0.0f,Animation.RELATIVE_TO_PARENT,0.0f); outToLeft.setDuration(500); outToLeft.setInterpolator(new AccelerateInterpolator()); return outToLeft; } // 右滑的進入動畫 public static Animation inFromLeftAnimation() { Animation inFromLeft = new TranslateAnimation(Animation.RELATIVE_TO_PARENT,-1.0f,Animation.RELATIVE_TO_PARENT,0.0f,Animation.RELATIVE_TO_PARENT,0.0f,Animation.RELATIVE_TO_PARENT,0.0f); inFromLeft.setDuration(500); inFromLeft.setInterpolator(new AccelerateInterpolator()); return inFromLeft; } // 右滑的退出動畫 public static Animation outToRightAnimation() { Animation outToRight = new TranslateAnimation(Animation.RELATIVE_TO_PARENT,0.0f,Animation.RELATIVE_TO_PARENT,1.0f,Animation.RELATIVE_TO_PARENT,0.0f,Animation.RELATIVE_TO_PARENT,0.0f); outToRight.setDuration(500); outToRight.setInterpolator(new AccelerateInterpolator()); return outToRight; }}
4、對應的效果圖如下
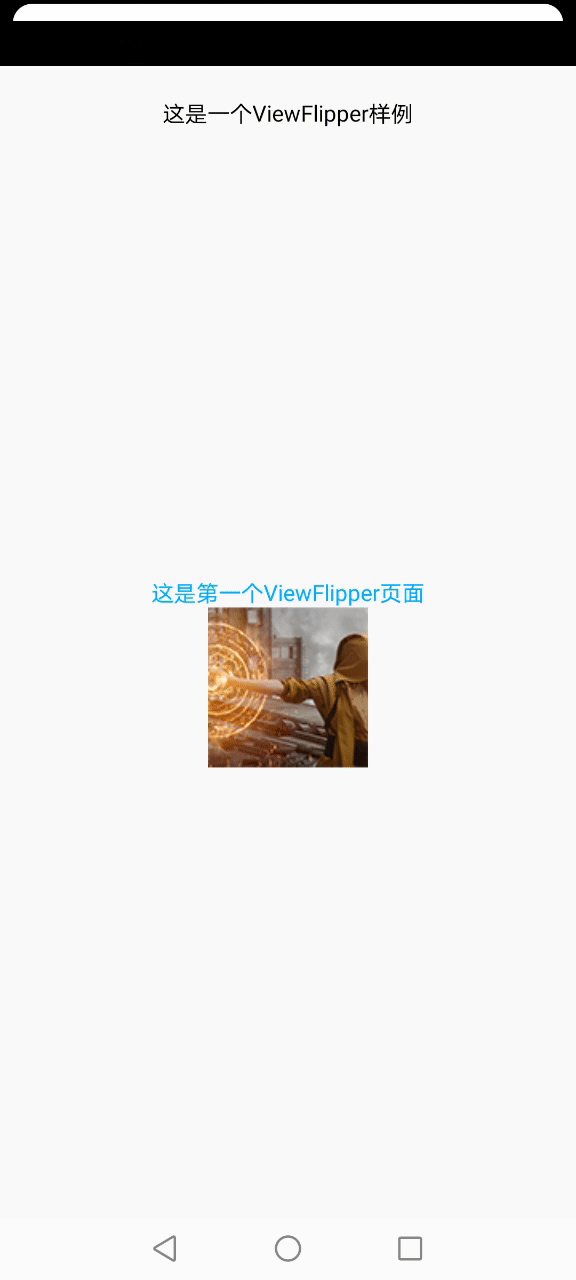
可以看到,這個左右滑動效果沒有任何酷炫的地方。我們不妨先來看看跟動畫相關的幾個重點地方:
(1)函數 setInAnimation:是指 View 進入屏幕的動效
(2)函數 setOutAnimation:是指 View 退出屏幕的動效
(3)TranslateAnimation的構造函數的參數解釋:
1、fromXType/toXType/fromYType/toYType,取值共有三個:
Animation.ABSOLUTEAnimation.RELATIVE_TO_SELFAnimation.RELATIVE_TO_PARENT
我這里用的是 Animation.RELATIVE_TO_PARENT,當傳入該參數時,其余幾個坐標值需要傳入百分比參數(1.0表示100%);如果傳入 Animation.ABSOLUTE,坐標值需要傳入屏幕上的絕對位置(比如1000,1000)
2、fromXValue:起點的橫坐標值
3、toXValue:終點的橫坐標值
4、fromYValue:起點的縱坐標值
5、toYValue:終點的縱坐標值
如果我們想讓這個效果變成45度從屏幕的四個角進入和退出,那代碼就應該這么寫(注意代碼中傳入的 4 個橫縱坐標值):
// 左滑的進入動畫public static Animation inFromRightAnimation() { Animation inFromRight = new TranslateAnimation( Animation.RELATIVE_TO_PARENT, 1.0f, Animation.RELATIVE_TO_PARENT, 0.0f, Animation.RELATIVE_TO_PARENT, -1.0f, Animation.RELATIVE_TO_PARENT, 0.0f); inFromRight.setDuration(500); inFromRight.setInterpolator(new AccelerateInterpolator()); return inFromRight;}// 左滑的退出動畫public static Animation outToLeftAnimation() { Animation outToLeft = new TranslateAnimation( Animation.RELATIVE_TO_PARENT, 0.0f, Animation.RELATIVE_TO_PARENT, -1.0f, Animation.RELATIVE_TO_PARENT, 0.0f, Animation.RELATIVE_TO_PARENT, 1.0f); outToLeft.setDuration(500); outToLeft.setInterpolator(new AccelerateInterpolator()); return outToLeft;}// 右滑的進入動畫public static Animation inFromLeftAnimation() { Animation inFromLeft = new TranslateAnimation( Animation.RELATIVE_TO_PARENT, -1.0f, Animation.RELATIVE_TO_PARENT, 0.0f, Animation.RELATIVE_TO_PARENT, -1.0f, Animation.RELATIVE_TO_PARENT, 0.0f); inFromLeft.setDuration(500); inFromLeft.setInterpolator(new AccelerateInterpolator()); return inFromLeft;}// 右滑的退出動畫public static Animation outToRightAnimation() { Animation outToRight = new TranslateAnimation( Animation.RELATIVE_TO_PARENT, 0.0f, Animation.RELATIVE_TO_PARENT, 1.0f, Animation.RELATIVE_TO_PARENT, 0.0f, Animation.RELATIVE_TO_PARENT, 1.0f); outToRight.setDuration(500); outToRight.setInterpolator(new AccelerateInterpolator()); return outToRight;}
對應的效果如下:
之所以有 -1.0f 這個值,是因為屏幕上的橫縱坐標值的分布可以用如下象限來表示:
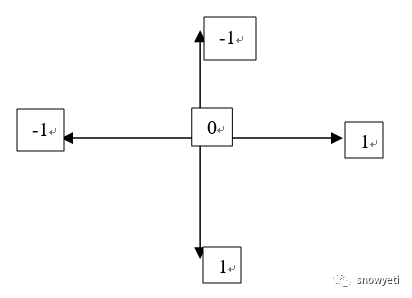
ViewFlipper中的 View 就位于象限的中心位置。因此,如果動畫從左上角進入,那么它的起始橫縱坐標就是(-1,-1)。大家可以按照這個思路去實現自己想要的動效。
到此這篇關于Android實現一個比相冊更高大上的左右滑動特效(附源碼)的文章就介紹到這了,更多相關android 實現左右滑動特效內容請搜索好吧啦網以前的文章或繼續瀏覽下面的相關文章希望大家以后多多支持好吧啦網!
相關文章:
 網公網安備
網公網安備