Spring Boot郵箱鏈接注冊(cè)驗(yàn)證及注冊(cè)流程
注冊(cè)流程【1】前端提交注冊(cè)信息【2】后端接受數(shù)據(jù)【3】后端生成一個(gè)UUID做為token,將token作為redis的key值,用戶數(shù)據(jù)作為redis的value值,并設(shè)置key的時(shí)長【4】后端根據(jù)用戶信息中的郵箱地址信息,檢驗(yàn)用戶是否已經(jīng)注冊(cè),如果沒有,生成注冊(cè)鏈接發(fā)送到用戶郵箱,如果已經(jīng)注冊(cè),提示用戶該郵箱地址已被注冊(cè)【5】用戶點(diǎn)擊郵件中的注冊(cè)鏈接【6】后端判斷redis中token是否過期,沒有將用戶信息保存到數(shù)據(jù)庫,提示用戶注冊(cè)成功項(xiàng)目源碼:https://gitee.com/residual-temperature/email-link-demo.git郵箱效果圖
1、pom文件要加入的jar包
<!-- 郵件相關(guān) --> <dependency> <groupId>org.springframework.boot</groupId> <artifactId>spring-boot-starter-mail</artifactId> </dependency> <!-- redis相關(guān) --> <dependency> <groupId>org.springframework.boot</groupId> <artifactId>spring-boot-starter-data-redis</artifactId> </dependency>
2、application.yml文件中要加入的配置
spring: redis: host: # redis地址 port: 6379 # redis端口號(hào)(默認(rèn)6379) password: # redis密碼 mail: host: smtp.qq.com # 郵箱協(xié)議 username: 地址 # 發(fā)送的郵箱地址 password: 授權(quán)碼 # 郵箱的授權(quán)碼
3、定義實(shí)體類
@Repository@Data@AllArgsConstructor@NoArgsConstructorpublic class User implements Serializable { private long id; private String account; private String password; private String username; }
注意
此處沒有g(shù)et(),set()方法是因?yàn)閷?dǎo)入了lombok包
4、redis的config配置對(duì)象的保存需要序列化,所以需要自定義RedisTemplete
@Configurationpublic class RedisConfig { //編寫自己的配置類 @Bean @SuppressWarnings('all') public RedisTemplate<String, Object> redisTemplate(RedisConnectionFactory redisConnectionFactory) {//為了開發(fā)方便一般使用<String,Object>RedisTemplate<String, Object> template = new RedisTemplate<>();template.setConnectionFactory(redisConnectionFactory);//JSON序列化的配置Jackson2JsonRedisSerializer jackson2JsonRedisSerializer = new Jackson2JsonRedisSerializer(Object.class);ObjectMapper om = new ObjectMapper();om.setVisibility(PropertyAccessor.ALL, JsonAutoDetect.Visibility.ANY);om.enableDefaultTyping(ObjectMapper.DefaultTyping.NON_FINAL);jackson2JsonRedisSerializer.setObjectMapper(om);//String的序列化StringRedisSerializer stringRedisSerializer = new StringRedisSerializer();//key采用String的序列化方式template.setKeySerializer(stringRedisSerializer);//hash采用String的序列方式template.setHashKeySerializer(stringRedisSerializer);//value序列化采用jacksontemplate.setValueSerializer(jackson2JsonRedisSerializer);//hash的Value序列化采用jacksontemplate.setHashValueSerializer(jackson2JsonRedisSerializer);template.afterPropertiesSet();return template; }}
5、驗(yàn)證鏈接生成和郵箱發(fā)送的工具類CodeUtils的配置
@Componentpublic class CodeUtils { @Resource JavaMailSender mailSender; @Resource RedisTemplate<String, User> redisTemplate; // 生成鏈接,并給接收的郵箱發(fā)送郵件 public boolean sendCode(User user){MimeMessage message = mailSender.createMimeMessage();try{ MimeMessageHelper messageHelper = new MimeMessageHelper(message); String token = UUID.randomUUID().toString(); // 生成UUID redisTemplate.opsForValue().set(token,user); redisTemplate.expire(token,300, TimeUnit.SECONDS); messageHelper.setFrom('發(fā)送方的郵箱地址'); //發(fā)送方的郵箱地址,而不是接收方的郵箱地址 messageHelper.setTo(user.getAddress()); // 接收方的郵箱地址 messageHelper.setSubject('注冊(cè)'); // 郵箱標(biāo)題 String html = '<html>n' + '<body>n' + '<p>請(qǐng)點(diǎn)擊下方鏈接注冊(cè)</p>n' + '<a href='http://localhost:8081/lookCode/'+token+''>http://localhost:8081/lookCode/'+token+'</a>' + '</body>n' + '</html>'; messageHelper.setText(html,true); // 郵箱內(nèi)容 mailSender.send(message); // 發(fā)送郵箱 System.out.println('發(fā)送成功'); return true;}catch (Exception e){ System.out.println('發(fā)送失敗'); return false;} } // 判斷token是否過期 public boolean eqToken(String token){return redisTemplate.hasKey(token); } // 根據(jù)token查詢用戶的信息 public User findUser(String token){return redisTemplate.opsForValue().get(token); }}
6、UserMapper的配置
@Mapper@Repositorypublic interface UserMapper { // 添加用戶 注解開發(fā)sql語句 @Insert('insert into user(account,password,username) values (#{account},#{password},#{username})') public int addUser(User user);}
7、UserService的配置
public interface UserService { // 添加用戶 public boolean adduser(User user); // 根據(jù)用戶注冊(cè)信息進(jìn)行注冊(cè)鏈接的的生成和發(fā)送 public boolean sendCode(User user); // 用戶點(diǎn)擊注冊(cè)鏈接判斷token是否過期 public boolean eqToken(String token);}
8、UserService的實(shí)現(xiàn)類UserServiceImpl的配置
@Servicepublic class UserServiceImpl implements UserService { @Resource UserMapper userMapper; @Resource CodeUtils codeUtils; /** * 添加注冊(cè)的用戶信息 * @param user 注冊(cè)的用戶信息 * @return 是否添加成功 */ @Override public boolean adduser(User user) {return userMapper.addUser(user) > 0; } /** * 生成鏈接和發(fā)送鏈接 * @param address 接收的郵箱地址 * @param user 注冊(cè)的用戶信息 */ @Override public boolean sendCode(User user) { if ( codeUtils.sendCode(user)) // 調(diào)用驗(yàn)證鏈接生成工具類中的生成鏈接和發(fā)送郵件函數(shù) return true; else return false; } /** * 判斷token是否過期 * @param token 用戶注冊(cè)所接收的token * @return 注冊(cè)成功與否 */ @Override public boolean eqToken(String token) {boolean flag = codeUtils.eqToken(token);if (flag){ User user = codeUtils.findUser(token); adduser(user); return true;}else { return false;} }}
9、UserController的配置
@RestControllerpublic class UserController { @Resource UserService userService; // 根據(jù)用戶注冊(cè)信息進(jìn)行注冊(cè)鏈接的的生成和發(fā)送 @PostMapping('/sendCode') public Map<String,String> sendCode(@RequestBody User user){boolean flag = userService.sendCode(user);Map<String,String> map = new HashMap<>();if (flag){ map.put('msg','郵件發(fā)送成功,請(qǐng)前往您的郵箱進(jìn)行注冊(cè)驗(yàn)證'); return map;}else { map.put('msg','郵件發(fā)送失敗'); return map;} } // 判斷是否注冊(cè)成功 @GetMapping('/lookCode/{token}') public Map<String,String> lookCode(@PathVariable('token')String token){boolean flag = userService.eqToken(token);Map<String,String> map = new HashMap<>();if (flag){ map.put('msg','注冊(cè)成功'); /* 后續(xù)的操作 ... ...*/ return map;}else { map.put('msg','注冊(cè)碼過期,請(qǐng)重新注冊(cè)'); return map;} }}
因?yàn)闆]有寫前端頁面,所以就用postman和頁面來演示
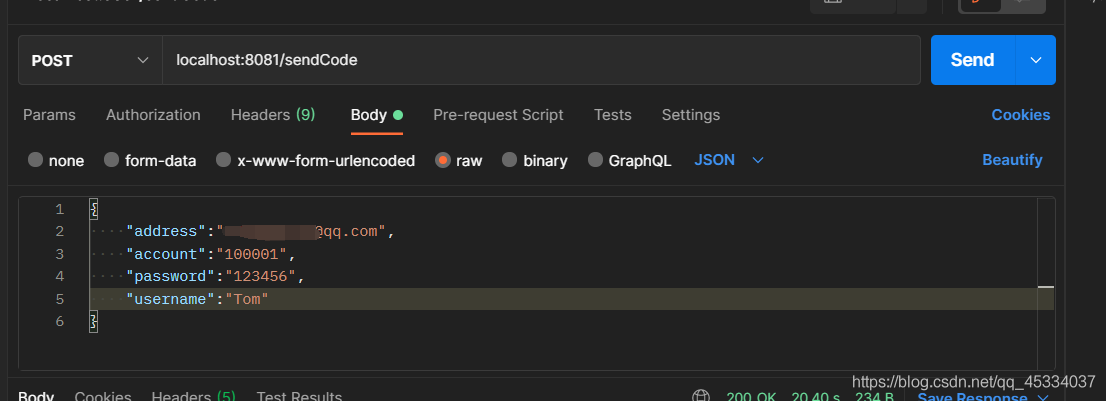
postman測試
傳入user對(duì)象
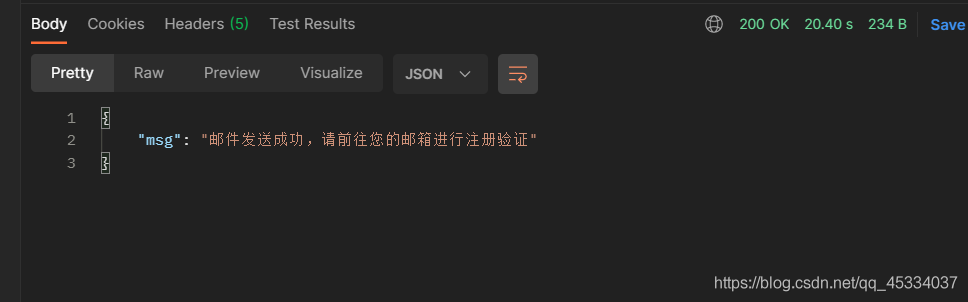
返回結(jié)果
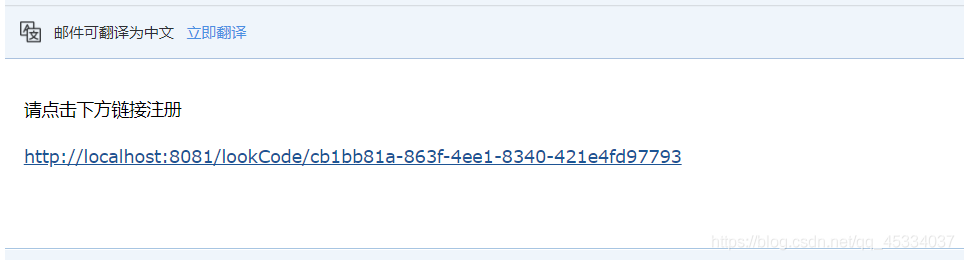
郵箱鏈接
點(diǎn)擊注冊(cè)鏈接之后

注冊(cè)成功之后數(shù)據(jù)庫前后對(duì)比
注冊(cè)成功之前 注冊(cè)成功之后
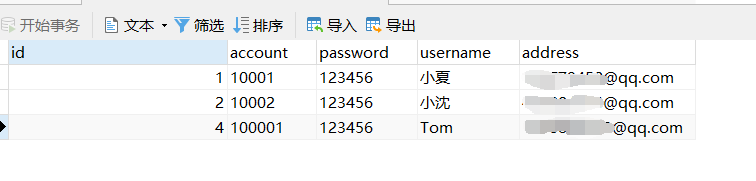
可能會(huì)遇到的問題【1】有些內(nèi)部網(wǎng)絡(luò)不支持發(fā)送郵箱,如果保證代碼沒錯(cuò),可以換個(gè)網(wǎng)絡(luò)試試【2】如果是在本地測試,連接的是本地redis,記得開啟本地的redis
到此這篇關(guān)于Spring Boot郵箱鏈接注冊(cè)驗(yàn)證及注冊(cè)流程的文章就介紹到這了,更多相關(guān)Spring Boot郵箱注冊(cè)驗(yàn)證內(nèi)容請(qǐng)搜索好吧啦網(wǎng)以前的文章或繼續(xù)瀏覽下面的相關(guān)文章希望大家以后多多支持好吧啦網(wǎng)!
相關(guān)文章:
1. .Net Core和RabbitMQ限制循環(huán)消費(fèi)的方法2. jsp文件下載功能實(shí)現(xiàn)代碼3. ASP動(dòng)態(tài)網(wǎng)頁制作技術(shù)經(jīng)驗(yàn)分享4. JSP之表單提交get和post的區(qū)別詳解及實(shí)例5. Xml簡介_動(dòng)力節(jié)點(diǎn)Java學(xué)院整理6. vue3+ts+elementPLus實(shí)現(xiàn)v-preview指令7. phpstudy apache開啟ssi使用詳解8. jsp實(shí)現(xiàn)登錄驗(yàn)證的過濾器9. 詳解瀏覽器的緩存機(jī)制10. 如何在jsp界面中插入圖片
 網(wǎng)公網(wǎng)安備