通過簡單方法實現spring boot web項目
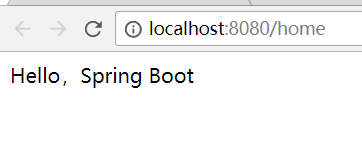
搭建效果為:
直接在網頁輸入請求,在頁面中顯示一行文字:Hello,Spring Boot
與一般的wen項目不同的地方:
1、不需要配置web.xml 文件,但需要注解@SpringBootApplication 等
2、一切和spring有關的jar包都不需要版本號,springcloud會給你選擇它最穩定的版本
3、它會定位public static void main()方法來標記為可運行類,必須在主路徑下
4、啟動方式:
a.右鍵運行main方法
b.由于我們使用了 spring-boot-starter-parent POM,所以可以使用 mvn spring-boot:run來啟動項目(根路徑)
c.先使用Maven來package(打包),然后java -jar*-0.0.1-SNAPSHOT.jar。
搭建
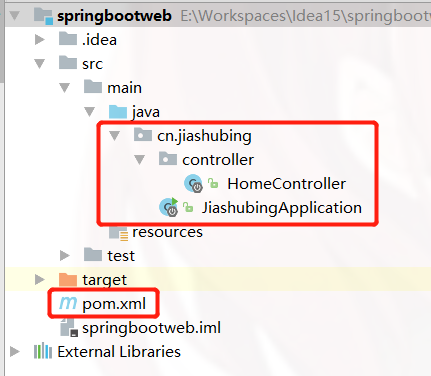
創建一個新的maven項目,目錄結構如下:

pom.xml文件
<?xml version='1.0' encoding='UTF-8'?><project xmlns='http://maven.apache.org/POM/4.0.0' xmlns:xsi='http://www.w3.org/2001/XMLSchema-instance' xsi:schemaLocation='http://maven.apache.org/POM/4.0.0 http://maven.apache.org/xsd/maven-4.0.0.xsd'> <modelVersion>4.0.0</modelVersion> <groupId>cn.jiashubing</groupId> <artifactId>spring-boot-web</artifactId> <version>1.0-SNAPSHOT</version> <parent> <groupId>org.springframework.boot</groupId> <artifactId>spring-boot-starter-parent</artifactId> <version>1.5.2.RELEASE</version> </parent> <dependencies> <dependency> <groupId>org.springframework.boot</groupId> <artifactId>spring-boot-starter-web</artifactId> </dependency> </dependencies> <build> <plugins> <plugin><groupId>org.springframework.boot</groupId><artifactId>spring-boot-maven-plugin</artifactId> </plugin> </plugins> </build></project>
HomeController.java文件
package cn.jiashubing.controller;import org.springframework.boot.autoconfigure.EnableAutoConfiguration;import org.springframework.stereotype.Controller;import org.springframework.web.bind.annotation.RequestMapping;import org.springframework.web.bind.annotation.RequestMethod;import org.springframework.web.bind.annotation.ResponseBody;/** * @author jiashubing * @since 2018/5/30 */@Controller@EnableAutoConfigurationpublic class HomeController { @RequestMapping(value = '/home', method = RequestMethod.GET) @ResponseBody public String home() { return 'Hello,Spring Boot'; }}
JiashubingApplication.java文件
package cn.jiashubing;import org.springframework.boot.SpringApplication;import org.springframework.boot.autoconfigure.SpringBootApplication;/** * @author jiashubing * @since 2018/5/29 */@SpringBootApplicationpublic class JiashubingApplication { public static void main(String[] args) { SpringApplication.run(JiashubingApplication.class, args); }}
在瀏覽器中輸入 http://localhost:8080/home
最終效果如下:

以上就是本文的全部內容,希望對大家的學習有所幫助,也希望大家多多支持好吧啦網。
相關文章:

 網公網安備
網公網安備